

Raspberry Pi Beginner Projects: Raspbian Operating System
<< Previous
First
2
3
4
5
6
7
8
Last
Next >>
Raspberry Pi Beginner Projects: Setting Up Raspberry Pi Beginner Projects: Parts List Raspberry Pi Beginner Projects: Putting The Hardware Together Raspberry Pi Beginner Projects: Raspbian Operating System Raspberry Pi Beginner Projects: Updating Raspbian Raspberry Pi Beginner Projects: Installing VNC Raspberry Pi Beginner Projects: Using SSH and SFTP Raspberry Pi Beginner Projects: Give your Pi a name Raspberry Pi Beginner Projects: Making The File System Visible
Installing the operating systemThe process of installing a single operating system on an SD card is not difficult and I think that it is the best way to go in most circumstances. However if you are a complete beginner then you might want to consider using the Pi's "New Out Of Box System" or "NOOBS". If installing a single OS is simple then using NOOBS is trivial. I will be going through the installation of the Raspbian OS in this article. If you want to use NOOBS instead then please see the instructions here: NOOBS installation instructions Why Raspbian?Why did I choose to install the Raspbian operating system? That's a good question considering there are no fewer than 6 different systems offered on the official Raspberry Pi download page and can be downloaded from here: https://www.raspberrypi.org/downloads/ Before deciding on an appropriate OS you have to ask yourself what you want this installation to do? You can always change your mind later and replace your system with a different one or install onto a new SD card of course. Changing the operating system is as easy as replacing the SD card in your Pi but you have to start somewhere. I want to use my Raspberry Pi B+ to develop software and to find useful projects to build with it. Future projects might include a file and printer server, temperature monitor, home automation etc. Two of the OSs OpenElec and RaspBMC, are dedicated to being media centres so I ruled these out straight away. RISC OS is designed for hi performance embedded applications but it's too specialized for my current needs. I would prefer a more mainstream OS that is well supported in the community like Linux so that leaves three systems to choose from. Raspbian, Pidora and Arch Linux are all respected Linux distributions and would most likely satisfy my needs. Raspbian is the official Raspberry Pi Linux system and is the most commonly used OS on the Pi. It is also very well supported both in the RPi community and the wider Linux universe. This is the one for me. Download Raspbian and Win32DiskImagerDownload a zip file containing the Raspbian Debian Wheezy disk image from here: Raspberry Pi download page and unpack the contents. You will also need a utility capable of writing a disk image to your flash card. Win32DiskImager will do the job on a Windows machine. If you don't have it already then download a copy from https://sourceforge.net/projects/win32diskimager/ and install it. Copy the Raspbian disk image to your micro SD cardI had a spare 16GB class 4 micro SD card so thats the one I used to do my installation. You don't have to use one of the same size if you don't want to. A 4GB or 8GB device will do. You just won't have as much spare disk space for programs and data. If you have a choice then use the fastest card you can. My class 4 card is relatively slow but it still does a good job. Insert your micro SD card into your computer either by using a standard SD adapter or a USB micro SD card reader. Then start up your disk imaging utility. On a Windows machine you can use Win32DiskImager but it must be "Run as administrator" otherwise it won't work.
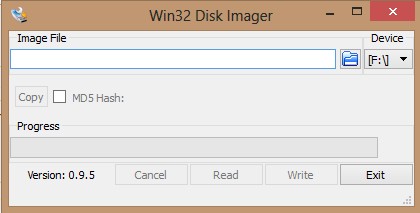
Click the folder icon to the right of the file edit field in Win32DiskImager and select the Raspbian image file that you downloaded and unpacked earlier. Select the drive letter of the micro SD card from the menu to the right of the open file button. Click the "Write" button and wait for your SD card to be written. When the image file has been successfully written to the SD card remove it from your PC, make sure that your Pi is not powered and slide the card into the tiny micro SD slot on the underside of the Pi. Push it in until it clicks. Make sure that you have connected your keyboard, mouse or touchpad and TV then plug the power supply If all goes well and you remembered to switch your TV monitor on then you should see the Linux boot sequence scrolling up the screen faster than you can possibly read it. Eventually the Pi provides a setup menu that will not appear on subsequent boots.
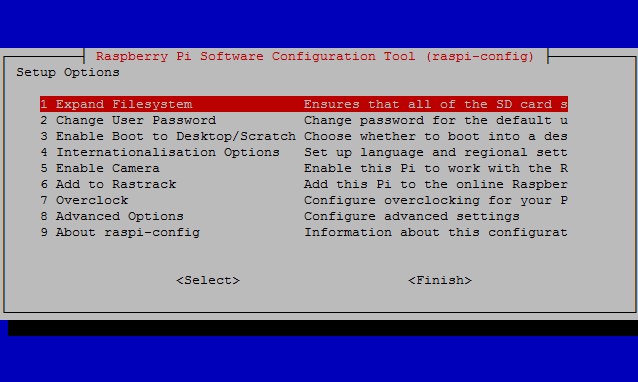
I left everything at the default settings which amongst other things sets the Pi to boot into a command line interface rather than the graphical desktop. This is the best option for me as most of the time I will be driving it remotely and I can start up the desktop whenever I need it.
Exit the menu by selecting
login as: pi You will not see the password appear on the console as you type it. This is a security measure to make sure that noone can see your password if they are looking over your shoulder. You can start the GUI now if you wish by entering the command: pi@raspberrypi ~ $ startx When you have finished playing with the desktop shut it down and then power off. You should always shut down the system in this way either from the desktop or the command line. If you don't then you run the risk of corrupting your installation if the power goes down while system files are being written to disk. Power up again and wait for the command line login prompt to appear. You can login with the following default account credentials:
login as: pi If login is successful then the Pi will greet you will a little information including the time that you last logged in. Note that the Pi does not have a hardware real time clock so it has no way of remembering the time when it is switched off. Instead it tries to access an NTP (Network Time Protocol) server on the Internet. If your Pi is connected to the Internet then it will always have the correct time. If not then it will always be the 1st January 1970 when it is switched on. Shutdown the system gracefully: pi@raspberrypi ~ $ sudo poweroff On the next page I show you how to update the system in case the download system image isn't 100% current.
<< Previous
First
2
3
4
5
6
7
8
Last
Next >>
Raspberry Pi Beginner Projects: Setting Up Raspberry Pi Beginner Projects: Parts List Raspberry Pi Beginner Projects: Putting The Hardware Together Raspberry Pi Beginner Projects: Raspbian Operating System Raspberry Pi Beginner Projects: Updating Raspbian Raspberry Pi Beginner Projects: Installing VNC Raspberry Pi Beginner Projects: Using SSH and SFTP Raspberry Pi Beginner Projects: Give your Pi a name Raspberry Pi Beginner Projects: Making The File System Visible |
| Now subscribe to our newsletter and don't miss a thing |
|
|

You should assume that there is an affiliate relationship and/or another material connection to the providers of goods and services linked to on this page and that we may be compensated when you purchase from a provider. Homediyelectronics.com is a participant in the Amazon Services LLC Associates Program and the Amazon EU Associates Programme, an affiliate advertising program designed to provide a means for sites to earn advertising fees by advertising and linking to amazon.com and amazon.co.uk.
Copyright © 2013 - 2024 homediyelectronics.com |
Legal |
Contact me |
Feed |
Google |
Site Map
Comments
No comments yet.Add Comment