


Arduino Timer Interrupt Example
Reentrant interrupts are not hard to useSee the full range of Arduino products There are countless examples of Arduino sketches on the Internet covering all but the most obscure and complicated projects. Most of these sketches or programmes concentrate on getting the job done in the main loop() function and rarely venture into the world of interrupts. I'm going to show you how you can take advantage of internal timer interrupts on the Arduino using a couple of LED's and a simple code sketch. Not only will I show you how to get a regular timed interrupt to work but I will also demonstrate the advantages of reentrant routines. That is interrupts that are allowed to interrupt themselves. It is true that interrupt use can lead to unpredictable code behaviour that is difficult to debug but they can also greatly enhance your projects if you follow a few simple rules.
Why use interrupts in your Arduino projectsIn general most tasks can be accomplished without resorting to interrupts but if you do then the use of interrupt service routines can clean up your code and add another dimension to your programmes. ISRs can be used to:
Things you need to play with timer interrupts
The LED Interrupt Circuit diagram
Simple Arduino Interrupt Demonstrator
Connect up the circuit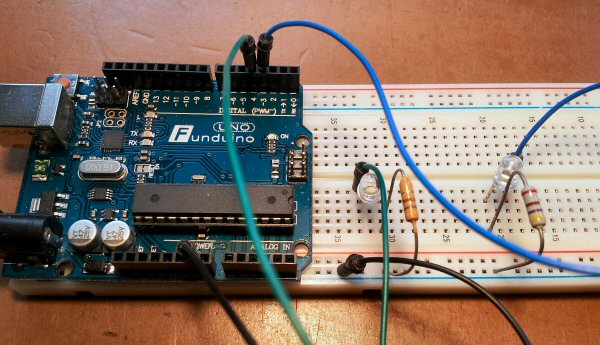
Arduino Interrupt LED Connections Buy an Arduino Uno now and start building smart electronics projects
Download and install the Arduino Timer One libraryIt is perfectly possible to write code that directly interfaces with the hardware including the internal ATmega328 timers on the Arduino. This would have been an interesting exercise but it isn't really what this guide is all about and there is a convenient code library available that does just what we need. This demonstration is based on The ATmega328's Timer 1 so you should download and install the TimerOne library as below. Download the timerOne library from https://code.google.com/p/arduino-timerone/downloads/detail?name=TimerOne-v9.zip&can=2&q= and install it using the guide https://arduino.cc/en/Guide/Libraries
Copy and paste the Arduino interrupt demo sketch belowLoad the sketch onto your Arduino Uno and let it run. Both LED's will flash regularly. LED D1 will flash every 4 seconds and LED D2 will flash 5 times a second
What is happening here?If you you speed up the flashing rate by adjusting the values of "TIMER_US" and "TICK_COUNTS" you can observe the pulses on an oscilloscope. If you don't have an oscilloscope you can build yourself one very cheaply using my book as a guide: Sound Card Oscilloscope: Build Better Electronics Projects. When the sketch initializes and setup() is run, the ATmega328's timer 1 is set to interrupt every 100ms and every time it interrupts the state of LED D2 is toggled making it flash on and off 5 times a second. 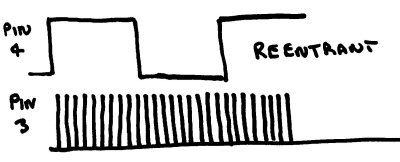
Reentrant timer 1 timing diagram The interrupt service routine timerIsr() counts down a timer variable starting at 20. When it reaches zero the function tick_2s_isr() is called. This routine is called every 2 seconds as a result. But the tick_2s_isr() function contains a time consuming loop which takes much longer than 100ms so how is it that the interrupt routine can keep flashing D2? It can do this because tick_2s_isr() enables interrupts using the interrupts() function. When interrupts are enabled the timerIsr() is able to service every interrupt even though it calls a function that takes a long time to process. The interrupt ISR is said to be reentrant. Now what would happen if tick_2s_isr() did not enable interrupts so there was no way for the function to be reentered? Try it. Comment out the lines with "interrupts()" and "noInterrupts()" like this:
// interrupts(); Load and run the sketch and you should see that LED D2 now has to pause until the tick_2s_isr() completes before it flashes. The time between calls to the tick_2s_isr() function also increases due to the ISR not maintaining the regular count. 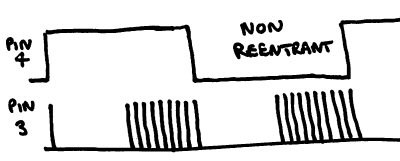
Non reentrant timer 1 timing diagram
Follow the rules of interruptsThe Arduino is an amazing little microcontroller board that could easily find use in the most sophisticated of electronic systems and yet it is so cheap and easy to use. The low cost and easy programming make this board perfect for hobby electronics projects and the ability to use interrupts is an awesome capability but you do have to follow some rules.
| ||||||||
| Now subscribe to our newsletter and don't miss a thing | ||||||||
|
|


You should assume that there is an affiliate relationship and/or another material connection to the providers of goods and services linked to on this page and that we may be compensated when you purchase from a provider. Homediyelectronics.com is a participant in the Amazon Services LLC Associates Program and the Amazon EU Associates Programme, an affiliate advertising program designed to provide a means for sites to earn advertising fees by advertising and linking to amazon.com and amazon.co.uk.
Copyright © 2013 - 2026 homediyelectronics.com |
Legal |
Contact me |
Feed |
Google |
Site Map
Comments (5)
I want to perform a tempearatur saver (which saves data every 60s)) and dispaly it with lcd!
would you please help me!
thanks
Now I know what interrupts are!
Add Comment