Click here for a free subscription to "HDE" our site newsletter.

Building The Astable Multivibrator Part 2

Building The Astable Multivibrator LED Flasher Part 2


You are almost there. You just have the resistors, capacitors and battery to install and you will be ready for the big switch on.

Now the four resistors
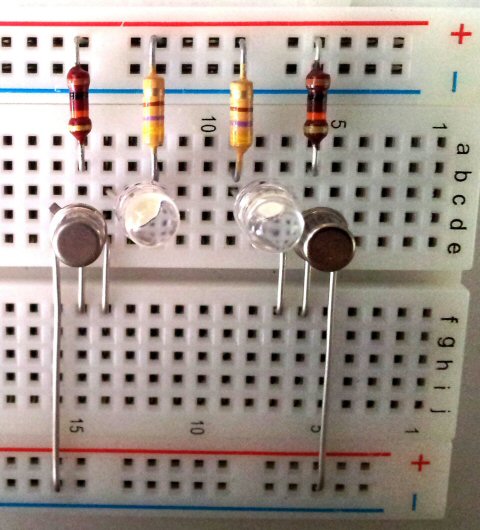
Bend and push the resistor leads into the board as shown. Resistors do not have a polarity so you can put them in either way round but you must get the correct value resistors in the correct positions. You may want to trim the leads with wire cutters before placing in the board. This won't make it work any better but the circuit will end up looking neater.

The two resistors in the middle are 470 Ohm and the two on the outside are 10k Ohm values.

Two capacitors to finish
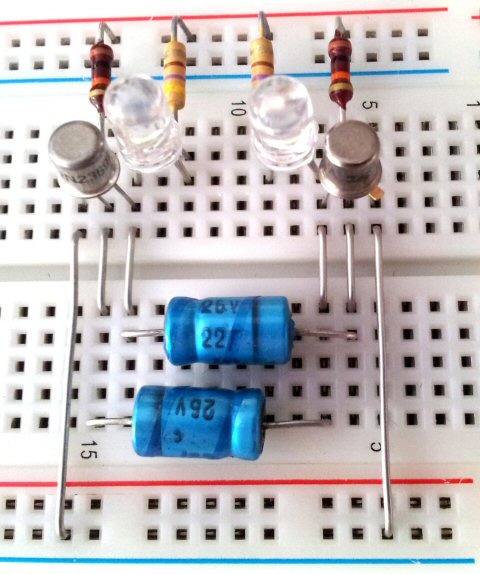
Bend and insert the capacitor leads as shown. Your capacitors may look different to mine and you must make sure that you put them in the correct way.

Electrolytic capacitors have a positive and a negative end. This is often shown with a '+' or '-' symbol close to the leads. If the capacitor has a lead at each end a black band may denote the negative end while a groove may be close to the positive end. Make sure you check before powering your circuit.

Use a 9v battery for power
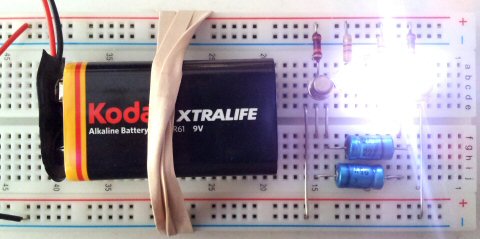
I secured my 9 volt battery to the board with an elastic rubber band. You can do the same or find another method. Use a clip on battery connector and insert the leads in the power lines at the top and bottom of the board. Positive to the red row at the top and negative to the black row at the bottom.

Power up the circuit
Attaching the power from the battery should make your circuit burst into life and start flashing.

If it doesn't start flashing immediately then disconnect the battery immediately and check all of your connections. If you are certain that everything is connected correctly and it still doesn't work then start replacing components one by one until you find the faulty one. Start swapping components for new in this order - Battery - Battery connector - Transistors - LEDs - Capacitors - Resistors - Solderless breadboard.

Don't give up until you find the problem in your circuit. There isn't much that can go wrong.


Now subscribe to our newsletter and don't miss a thing


Comments (5)

Topic: How To Build An Astable Multivibrator Circuit Without Solder
Full StarFull StarFull StarFull StarFull Star 5/5 (1)
Facebookdel.icio.usStumbleUponDiggGoogle+Twitter
Full StarFull StarFull StarFull StarFull Star
Amalia (US) says...
Can anyone tell me how to place 2 toy DC motors on the breadboard so that they intermittently go on and off like the LEDs? Or is this not possible? I want to use it to power a toy that zig zags. I'm going to try it anyway tonight but I would like help on where to connect the motors on the breadboard since I am a novice. Thank you.
19th August 2019 8:10pm
Richard says...
An excellent little circuit! Thanks. I shall be using this for a dummy alarm. Any ideas how long the nine volt battery will last (i.e how much current does the circuit consume)?
6th August 2015 3:56pm
Steve (UK) says...
Hi Richard,

As it stands the circuit consumes about 15mA and if the battery is alkaline with a capacity of 625mAh then it should last approximately 30 - 40 hours.

You can try increasing the values of the two collector resistors R1 and R4. Common high efficiency LEDs will still glow brightly with only 1mA so try replacing the 470 ohm resistors with 4.7k ohm. This theoretically should allow the battery to last for up to 600 hours.

Steve
6th August 2015 11:34pm
James says...
Wow, super cool... my first brush with electronics! I am curious, how can you change the rate of flashing? Also, how would you apply this circuit to producing a audible noise (sine wave)? Again, thanks so much!
23rd November 2014 8:59pm

Add Comment

* Required information
(will not be published)
 
Bold Italic Underline Strike Superscript Subscript Code PHP Code Quote Insert line Bullet list Numeric list Link Email Image Video
 
Smile Sad Huh Laugh Mad Tongue Crying Grin Wink Scared Cool Sleep Blush Unsure Shocked
Captcha
Refresh
 
Enter code:
 
Notify me of new comments via email.
 
Remember my form details on this computer.
 
I have read and understand the privacy policy. *
 
I have read and agree to the terms and conditions. *
 
Click here for a free subscription to "HDE" our site newsletter.