Click here for a free subscription to "HDE" our site newsletter.

PC Sound Card Oscilloscope Probe Construction

Putting the Sound Card Oscilloscope Probe Together

Build an even better PC sound card based oscilloscope using my book: Sound Card Oscilloscope - Build Better Electronic Projects. Everything is explained in great detail how to build the scope probe, a calibrator and a handy signal generator. I also show you how to build it all into small enclosures that fit nicely on your desk next to your PC.

If you want to buy a cheap but inexpensive USB based oscilloscope then you could do worse than the Hantek 6022BE USB scope.

PC sound card scope probe board

You should by now have all the components that you will need to complete the construction of your PC scope probe so lets start by preparing the board that you will build it on.

Then place your components on the board and route the leads on the underside. Finally, solder the connections and the input and output connections. When this is complete you will be ready to install the software on your PC and start using your oscilloscope.

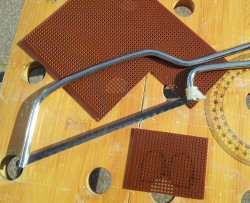
Perforated board cut to size

Use a small saw to cut your perforated board to size. Before you do this you should take your components and lay them onto the board in the positions you want them and then mark out the edges of the board allowing enough space for all components and connections.

My board measured approximately 60mm (2.4inch) x 48mm (1.9inch). Remember it is better to overestimate the size you need rather than cut the board too small to fit the parts onto.

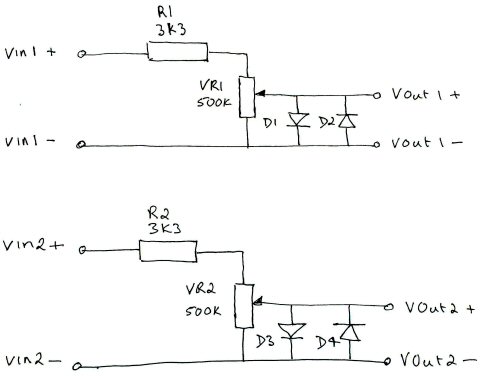
Scope probe circuit diagram

Remind yourself of the circuit diagram. The circuit is simple and in two identical parts.

Input/output scope probe diagram

It will be helpful at this point to draw a sketch of what you want the final PC scope probe to look like with the input and output connections marked on it.

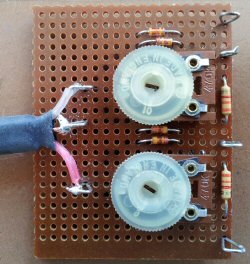
PC scope probe from above

This is the top side of my finished scope probe board. Note that each of the two pairs of diodes are connected top to toe in parallel.

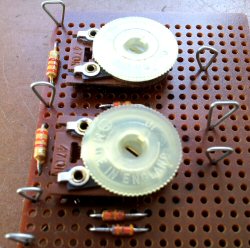
PC scope probe from above at an angle

This is a slightly different view of the top side of my board showing how I mounted the home made connection posts. If you choose to use the alternative method of making the posts then be sure to allow extra room for the additional hole that each post will take up.

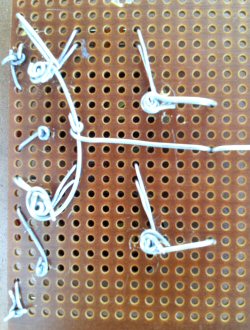
PC scope probe underside showing wiring

If you can you should make all the connections on the underside of your board by wrapping the leads together. When you have finished carefully inspect the wiring and compare it against the circuit diagram. It is much easier to correct any errors at this stage before you solder all the connections.

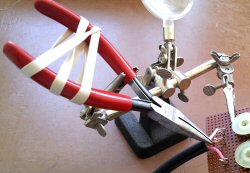
Pliers used as a heat sink

Before you start soldering please bear in mind that your components will get hot during this process and that electronic parts can be damaged by excessive heat. This is a general problem with building electronic projects so it's a good idea to try and minimize the time that you apply the hot soldering iron. In some instances you can apply a heat sink to the component leads to conduct some of the heat away from the device. Semiconductor devices like transistors, diodes and integrated circuits are very susceptible to heat damage.

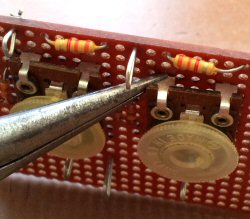
Heat sink pliers clamped to component

I have a simple technique that works well for me. I use a pair of Long nose pliers to grip the component lead between the device and the point where you apply the heat. The problem with this is that you end up needing 3 hands to hold the pliers in place while you apply the solder. Placing a strong elastic band around the handle of the pliers should hold them clamped onto the lead long enough for you to solder it.

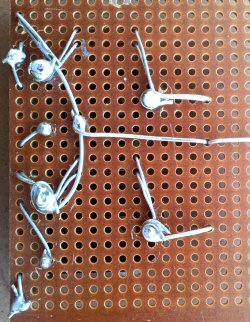
PC scope probe soldered wiring

Solder all the connections. If you are not sure about how to solder then be sure to go through the soldering tutorial Soldering Is Easy before you start.

PC scope probe output connections

Take your audio lead and cut off one of the 3.5mm jack plugs. Strip the wires slip a small length of heat shrink tubing on to keep the end tidy and connect the two inner cores to Vout1 and Vout2 and the outer braid of the wire to the common connection as shown.

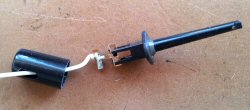
Clip on probe disassembled

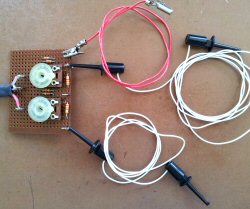
For your input connections you can either use crocodile clips or small probe clips. I like these small clips as they are easy to connect up and to use.

Clip on probe assembled

It's best to use flexible wire for your probe cables. Push it through the hole in the clip, strip the insulation, solder the connection and snap the two halves of the clip back together.

Finished sound card scope probe

This is how my final PC scope probe looks. It's not very pretty but it works. On the next page I show you how to get the software up and running with your probe.


Now subscribe to our newsletter and don't miss a thing


Comments (50)

Topic: How To Make A Free Sound Card PC Oscilloscope
Full StarFull StarFull StarFull StarHalf Star 4.5/5 (24)
Facebookdel.icio.usStumbleUponDiggGoogle+Twitter
Full StarFull StarFull StarFull StarFull Star
GP (US) says...
I've wanted to have a scope show NTSC video on screen in a raster but never tried it. Now retired don't have access to a scope. It would be nice to add a Z access to this program for showing an image. would probably use the Mic input. I can make a rectangle show using square wave from the generator but see where people make sync separators and create sawtooth signals. A few places I had access to nice signal generators. Was always too busy to play around. Thanks for this program.
10th November 2022 3:19am
Full StarFull StarFull StarFull StarFull Star
Eleguru (US) says...
It's really an awesome idea. Not only one will save a tremendous amount of money but also gain a lot of knowledge. Thanks for sharing!
29th April 2018 7:38am
Full StarFull StarFull StarFull StarFull Star
Radu (Romania) says...
Great project , i have some questions if you don't mind . What is the maximum audio voltace i could apply to the measurement probes,i i were to test lets say a 30 w rms amplifier , is it possible ? If it is possible what should i do , some extra circuit ? And second question what is the max bandwith , like 20 Hz ... 2o KHz . Thank you and all the best from Romania !
Smile
30th January 2018 5:25pm
Aidan (US) says...
can it handle ac current
2nd December 2017 5:15pm
Full StarFull StarFull StarFull StarEmpty Star
venturini patrick (France) says...
SmileHello Thanks for your video . Beccause , befor having enough money tu by a osciloscope , i will try to build the litlle osciloscope .
But cant find the link ( lin adress ? ) tocharge on the computer ( for simulating the 2 channels of a osciloscope ).?
Could you answersto my mail adress ?
Thank
Your
Bes t regards
Patrick Montpellier France
4th September 2017 9:12pm
Novalar says...
Good article!
22nd August 2017 8:40pm
Novalar says...
Thanks! I used this to measure a laser driver stability when switching the current, I was able to see the switch spikes perfectly!
22nd August 2017 7:57am
Dan (US) says...
Can the scope described in the book work with a Linux based software?
30th June 2017 9:05pm
Full StarFull StarFull StarFull StarEmpty Star
MikeF (UK) says...
Scope works perfectly in Linux under WINE. For safety use an external USB sound card (very cheap), and select the new card in the Sound settings. A far greater value can be chosen for the input resistor, say 100k ohm plus, and the diodes can be doubled (in series) to give slightly greater range.
22nd October 2018 12:42pm
Full StarFull StarFull StarFull StarFull Star
Sam (India) says...
Hi, this is an amazing idea and this is going to save me a lot of money. I have not yet built this circuit. I have a few questions to get cleared.
1. To which port of my do I connect the output probe to? headphones or microphone or line-in?
2. For my experiments, I may have to operate around a voltage of 15 to 22 volts. Will this pose a threat to my sound card?
9th April 2016 7:33am
Full StarFull StarFull StarFull StarFull Star
Dave (Australia) says...
Hi, thanks for sharing this build, it's great.
I want to make this oscilloscope to test sensors and wiring on my car, but the cars voltage is between 12v and 14.4v.
Will this work for me?
Or, are there any changes that I can make to the design so that it will cater to my needs?

Thank you. Smile
1st April 2016 10:20am
Steve says...
Hi Dave,

Yes this should work fine providing that you stay well away from the high voltage part of the engine. That will be the spark plugs and induction coil etc. It should work ok for sensors that are likely to be 12v powered. Always Test the signals with a multimeter first. Test for DC voltage and AC voltage and do not use the scope on anything over 30v.

Steve
5th April 2016 9:15am
David Schroeder (US) says...
Is it possible to store a single sweep with this system? Currently I have a Textronix 465B scope, and my experiment setup entails a single sweep for each run, triggered by a specially timed pulse. It's hard to analyze any detail as the image on the screen is so transient. Being able to capture a single sweep and continuously display it would be really useful.
21st January 2016 10:14pm
Steve (UK) says...
Hi David,

I do believe that you can store a single sweep. You can set it for single sweep and get it to trigger somewhere of interest.

Steve
31st January 2016 1:44pm
David Schroeder (US) says...
Is it possible to store a single sweep with this system? Currently I have a Textronix 465B scope, and my experiment setup entails a single sweep for each run, triggered by a specially timed pulse. It's hard to analyze any detail as the image on the screen is so transient. Being able to capture a single sweep and continuously display it would be really useful.
21st January 2016 10:14pm
David Schroeder (US) says...
Is it possible to store a single sweep with this system? Right now I have a Textronix 465B scope, and my experiment setup entails a single sweep for each run triggered by a specially timed pulse. Currently it's hard to analyze detail as image on the screen is so transient. Being able to capture a single sweep and continuously display it would make it really convenient.
21st January 2016 10:09pm
Full StarFull StarFull StarFull StarFull Star
Keerthana (India) says...
can we implement a phase locked loop using sound card
12th December 2015 4:12pm
Steve (UK) says...
Hi Keerthana,

In theory you could build a phase locked loop by adjusting the output waveform from the headphone socket in real time depending on the waveform input through the microphone input.

I'm not aware of any PLL software for the pc so you would need to write some code to do it. This is way beyond the scope of this article unfortunately.

Steve
12th December 2015 5:26pm
adil (India) says...
instead of pc can i use android based cell phone(smart phones)... you find many app in play store can this circuit support any one can help me out!!
17th November 2015 2:19pm
Full StarFull StarFull StarFull StarFull Star
adil (India) says...
instead of pc can i use android based cell phone(smart phones)... you find many app in play store can this circuit support any one can help me out!!
17th November 2015 2:17pm
Full StarFull StarFull StarFull StarFull Star
Saurabh (India) says...
Hi Steve :)
Can I use the above PC Sound Card based oscilloscope to display the ECHO & TRIG waves of an Ultrasonic Sensor Module(HC SR-04) ?
I see under your other project(s) on this website you are using HC SR-04; So I assume that you are better aware of the details for the same.

Regards,
Saurabh
29th August 2015 1:21pm
Steve (UK) says...
Hi Saurabh, The trigger pulse of the HC SR-04 is a minimum of 10 micro seconds which will not be easy to see with the sound card oscilloscope with a maximum bandwidth of 20kHz. However the trigger pulse doesn't have to be that fast. I used a trigger pulse of 50us in the project that I published on the site. At 50 micro seconds the pulse is just detectable by the scope. It won't look very square of course but you can detect it's presence which is usually what you want to see. You ... Read More
29th August 2015 5:44pm
Full StarFull StarFull StarFull StarFull Star
Pokke (US) says...
I just made a scope semi following your schematic from the book but used electrolytic 1uf caps and a 5k pot.
it seems to work right. I have been meaning to ask what the difference is between the poly box ones you use and the ones I used.
still much to learn, but having a great time with your book so far. now on to building the cali/generator. thanks Steve
29th June 2015 10:32pm
Steve (UK) says...
Hi Pokke, Using an electrolytic input capacitor is not a good idea. Worst case the capacitor could explode if you apply voltage in the wrong direction. It is more than possible that you will be applying AC signals to the probe that swing both '+ve' and '-ve' which may cause the capacitor to malfunction. Electrolytic capacitors work best when there is a DC bias across them. The terminal marked with a '+' should always be positive with respect to the '-ve' end. ... Read More
4th July 2015 2:29pm
Full StarFull StarFull StarFull StarFull Star
Don Burke (US) says...
Could you clarify a few things? I was looking at the one that Make did that is a copy except for the values and yours. There are 3 wires for the input and 3 for the output. So one is common on the input and one on the output. Your diagram shows 4 inputs and 3 outputs. on the input, I am guessing the v1- and v2- are the common ground. On the output, I am guessing the same is true, v1- and v2- are common ground and the v1+ and v2+ are separate on the plug to the sound card. Which pin on the ... Read More
24th May 2015 3:37am
Full StarFull StarEmpty StarEmpty StarEmpty Star
Don Burke (US) says...
3 years and no answer! Just skipped over! Don't waste your time asking a question if you are just learning. They will just pass over it.
30th April 2018 12:23am
Full StarFull StarFull StarFull StarFull Star
mike baker (UK) says...
Hi Steve,

Would this be suitable for reading a signal going to a moped tachometer?

The cable is wrapped around the spark plug wire.

Many thanks,

Mike
30th April 2015 9:52am
Steve (UK) says...
Sorry for the delay in replying. Auto ignition systems generate many thousands of volts and even one turn of wire around the ignition lead could induce very high voltages. For this reason I would say do not attempt this unless you are very confident that you know what you are doing. Worst case you could damage both the probe and your PC.

Steve
4th July 2015 2:13pm
João Alves (Portugal) says...
Hi Steve!

Unfortunately Amazon tells me that your book is not available for my country (Portugal).

I wonder if there is any other way to get it.

Thank you.
7th April 2015 8:30am
Steve (UK) says...
Hi João,

I'm very sorry that you are having a problem. Having just done a little research there appears to be some kind of copyright issue going on with Amazon purchases of ebooks in Portugal. I have no idea what it could be.

Some people have had success by buying from the amazon. com or . co. uk sites. You might want to try that. If you still have a problem then send me a message using the contact form (link at the bottom of this page) and I will see what I can do to help.

Regards
Steve
7th April 2015 9:34am
Full StarFull StarFull StarFull StarFull Star
sameh (Egypt) says...
its realy use ful thank you but i want to know the kind of the wire we use it to take the signal into the pc and its the most famous kind of it
20th February 2015 2:30am
Full StarFull StarFull StarFull StarFull Star
Marut (India) says...
Thank you so much Steve. It is amazingly precise and easy to follow.

I also have a question. You mentioned that it limits op voltage to 500mV. I was planning to use your arrangement for showing the output of an ECG circuit which amplifies heart signal to around 5V at the output. So shall my 5V output signal get distorted if I use your circuit arrangement?

Love and regards from India...
3rd August 2014 2:21pm
Steve (UK) says...
Hi Marut,

Yes you can use it to measure voltages up to about 30V with no problems. The input is attenuated and then clipped to a safe level for passing to the microphone input. Have you built the circuit in this article or did you use my Kindle book?

Regards
Steve
3rd August 2014 2:47pm
Marut (India) says...
I have used your above article to get an idea about this amazing concept. I am aware of your book on Kindle as well. Hope I can get my PQRST waveform on the PC screen through your circuit.

I was worried that I didn't have an oscilloscope at my disposal. I needed to rely on my college lab for that. Now your post has given me a real boost.Smile
3rd August 2014 3:45pm
Marut (India) says...
Roger that Smile
3rd August 2014 4:30pm
Full StarFull StarFull StarFull StarFull Star
Alessandro (Brazil) says...
Thanks! I used this to measure a laser driver stability when switching the current, I was able to see the switch spikes perfectly!
1st August 2014 11:01pm
Steve (UK) says...
Hi Alessandro, I'm pleased that you liked the project. I think that it's a great addition to anyone's tool kit. You might like to know that I've recently published a Kindle book entitled "Sound Card Oscilloscope: Build Better Electronics Circuits". It is far more comprehensive and shows you how to put it into a neat enclosure to make a permanent job of it. The book also covers building a calibrator to allow absolute amplitude measurements and a signal generator output ... Read More
1st August 2014 11:29pm
Full StarFull StarFull StarFull StarEmpty Star
mahmoud (Jordon) says...
thanks
30th July 2014 1:37am
Full StarFull StarFull StarFull StarFull Star
Narendra .K.C (India) says...
i am very grateful to you
27th July 2014 5:22pm
Full StarFull StarFull StarFull StarFull Star
beppe devercelli (Italy) says...
Really useful and comprehensive.
Thank youGrin
24th July 2014 5:55am
Full StarFull StarFull StarFull StarEmpty Star
CT (India) says...
great project! works great
i have a doubt though

How and why are we selecting a 3.3 k ohm and a 470k pot?
19th May 2014 12:07pm
Steve (UK) says...
Hi CT, The input resistor and potentiometer were chosen to provide maximum sensitivity and a degree of overload protection. The small 3.3k ohm resistor limits the current through the protection diodes to about 10mA max. with input signals up to 30V. The 470k ohm pot allows for small signals to be displayed while providing a higher input impedance with larger inputs. I'm currently trying out an alternative arrangement using a 470k ohm fixed input resistor and a 4.7k ohm potentiometer. This ... Read More
19th May 2014 4:34pm
CT (India) says...
oh Ok... got you point. Grin
another point that i was wondering about is how does the two zener diodes work.

P.S. im a noob in electronics :PSad
19th May 2014 4:56pm
Steve (UK) says...
The diodes are just ordinary diodes not zeners. I'm making use of the fact that if you forward bias a diode with a small voltage less than about 0.5-0.6v it will not conduct but if you increase the voltage then it conducts so hard that it will not allow the voltage to rise above 0.5-0.6v unless it burns up with excessive current. Connecting the diodes back to back prevents the AC signal amplitude from going more than plus or minus 0.5-0.6v. The objective is to protect the microphone input ... Read More
19th May 2014 5:31pm
Full StarFull StarFull StarFull StarFull Star
richard bromberg (US) says...
this question is about the oscilloscope leads.
What is a 3K3 resistor, do you mean a
3K Ohm resistor. excellent article
26th February 2014 1:32pm
Steve (UK) says...
Hi Richard,

A 3K3 resistor is just another way of saying 3.3K Ohms resistor. It's a kind of shorthand. Both types of notation is used widely and probably a few others.
26th February 2014 2:18pm
Ed Hahn (US) says...
3K3 means 3.3k
21st June 2014 9:11pm
Full StarFull StarFull StarFull StarFull Star
Steve (UK) says...
I used signal diodes with a fast switching characteristic capable of conducting 200mA. Diodes with a higher maximum forward current would give more protection.
17th February 2014 12:54am
Full StarFull StarFull StarFull StarEmpty Star
xavier (France) says...
Hello, thank you for sharing, what are the characteristics of D1 to D4 diodes ?
13th February 2014 2:18pm

Add Comment

* Required information
(will not be published)
 
Bold Italic Underline Strike Superscript Subscript Code PHP Code Quote Insert line Bullet list Numeric list Link Email Image Video
 
Smile Sad Huh Laugh Mad Tongue Crying Grin Wink Scared Cool Sleep Blush Unsure Shocked
Captcha
Refresh
 
Enter code:
 
Notify me of new comments via email.
 
Remember my form details on this computer.
 
I have read and understand the privacy policy. *
 
I have read and agree to the terms and conditions. *
 
Click here for a free subscription to "HDE" our site newsletter.