

Raspberry Pi Beginner Projects: Installing VNC
<< Previous
First
2
3
4
5
6
7
8
Last
Next >>
Raspberry Pi Beginner Projects: Setting Up Raspberry Pi Beginner Projects: Parts List Raspberry Pi Beginner Projects: Putting The Hardware Together Raspberry Pi Beginner Projects: Raspbian Operating System Raspberry Pi Beginner Projects: Updating Raspbian Raspberry Pi Beginner Projects: Installing VNC Raspberry Pi Beginner Projects: Using SSH and SFTP Raspberry Pi Beginner Projects: Give your Pi a name Raspberry Pi Beginner Projects: Making The File System Visible
Running a remote desktop with TightVNCThis is where the fun starts. It's great to be able to use a TV as a monitor together with a keyboard and mouse plugged into the Pi but you don't actualy need any of that. You can do it all, or most at least, from your PC anywhere on your network. You can even do it across the Internet from anywhere in the world if you want but I will leave that to a future article. So lets start with a remote desktop. Why not display the Pi's desktop on your PC instead of having to plug in a monitor? You can also use the keyboard and mouse on your PC to interact with the Pi just as if you were there at the console. To make this happen you can install a version of VNC (Virtual Network Computing)called TightVNC First login to your Pi:
login as: pi Install the TightVNC server on your Pi:pi@raspberrypi ~ $ sudo apt-get install tightvncserver Run it and choose a password: pi@raspberrypi ~ $ tightvncserver It may ask you if it can install some dependancies so let it do that. The password that you entered will be needed whenever you login to the VNC desktop remotely. Install the TightVNC client on your PC:Download it from here: TightVNC download You can get tightVNC clients for just about any platform you want to use, not just Windows. I even use it on My Android smartphone. Start the TightVNC remote desktop on your PiBefore you start up the remote desktop make sure that the desktop is not running on your Pi. It is possible to run the local and remote desktops at the same time but if the local desktop runs before the remote one then it will take the port number that the command below attempts to allocate to the remote desktop. For the sake of simplicity shutdown your Pi and boot it into the command line then issue the following command: pi@raspberrypi ~ $ vncserver :0 -geometry 1920x1080 -depth 24 This will start the remote server with a full size window on port 0. Find your Pi's IP addressAssuming that you have connected your Pi to your router the device will have been allocated an IP address. You can use this IP address to access your Pi on your network but first you need to find out what it is. At the console enter the following command: pi@raspberrypi ~ $ ifconfig What you will see is something like this:
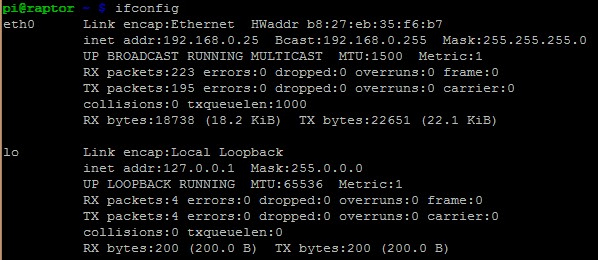
What you are looking for is the "inet addr" of "eth0". In this case the IP address is "192.168.0.25". You can now use this ip address to login to the remote desktop from your PC. Start the TightVNC clientStart the TightVNC client application on your PC or whichever platform you installed a client on.
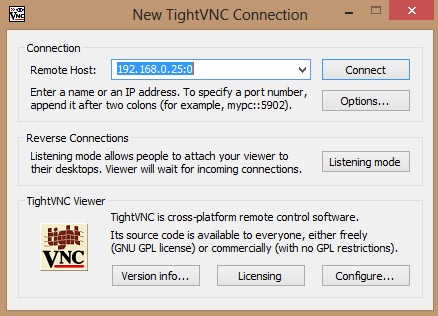
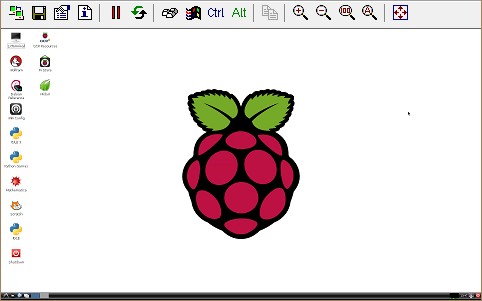
Enter the IP address of your Pi followed by the port number (0) of the VNC server: "192.168.0.25:0" and click "Connect". Then enter the password that you used when you installed TightVNC on your Pi. You should now see the desktop from the Pi on your PC similar to the screenshot below. You can interact with this desktop as if you were using the real desktop on your HDMI TV.
Making a shell file to launch the TightVNC server on your PiAll of the above works like a charm but it is a bit annoying having to type in that long command on the Pi every time you want to use TightVNC. To make it a little easier you can create a shell script to reduce the amount of typing you need to do. At the Pi's command prompt open the editor "nano" and create a file with the lines below in it: pi@raspberrypi ~ $ nano
#!/bin/bash Now type "^O" to give the file a name such as "govnc.sh" and save it. Then type "^X" to exit the editor. Before you can run the shell script you have to make it executable. To do this type the command: pi@raspberrypi ~ $ chmod 755 govnc.sh Now whenever you need to start the TightVNC server and access it across your network you simply have to type the following: pi@raspberrypi ~ $ ./govnc.sh You could arrange for this command to be executed at startup so that it's always available to you but I prefer not to do this with a development machine because it will just slow it down when it's not in use. Starting it up when you need to use it is not a hardship especially as you can do it remotely as you will see in the following pages.
<< Previous
First
2
3
4
5
6
7
8
Last
Next >>
Raspberry Pi Beginner Projects: Setting Up Raspberry Pi Beginner Projects: Parts List Raspberry Pi Beginner Projects: Putting The Hardware Together Raspberry Pi Beginner Projects: Raspbian Operating System Raspberry Pi Beginner Projects: Updating Raspbian Raspberry Pi Beginner Projects: Installing VNC Raspberry Pi Beginner Projects: Using SSH and SFTP Raspberry Pi Beginner Projects: Give your Pi a name Raspberry Pi Beginner Projects: Making The File System Visible |
| Now subscribe to our newsletter and don't miss a thing |
|
|

You should assume that there is an affiliate relationship and/or another material connection to the providers of goods and services linked to on this page and that we may be compensated when you purchase from a provider. Homediyelectronics.com is a participant in the Amazon Services LLC Associates Program and the Amazon EU Associates Programme, an affiliate advertising program designed to provide a means for sites to earn advertising fees by advertising and linking to amazon.com and amazon.co.uk.
Copyright © 2013 - 2026 homediyelectronics.com |
Legal |
Contact me |
Feed |
Google |
Site Map
Comments
No comments yet.Add Comment