


Sony Vaio Fan replacement
How to replace a noisy laptop fan
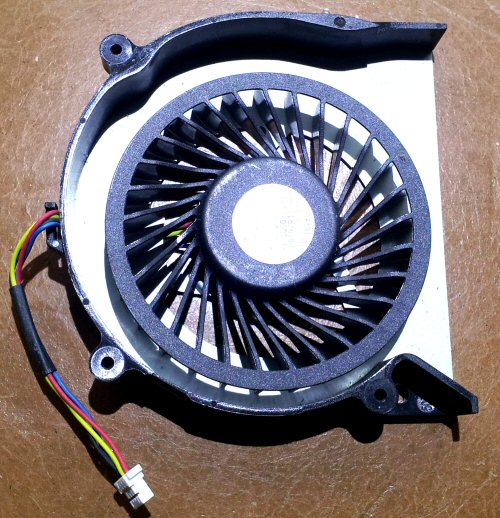
My Sony VAIO model sve171e13m was 2 years old when it started to make a loud rattly noise from the cooling fan. I tried to ignore it for a while and I found that if I let it get warm then tapped the case at the top of the keyboard I could get it to quieten down for a while. I went for months like this, tapping the case until it went quiet but I eventually gave in and decided to fix it. The first thing to do is to locate and obtain a replacement fan. I was unable to find a supplier here in the UK and in the end I went for a unit from China. I purchased it through "CPU Cooling Fan" https://www.cpu-cooling-fan.co.uk I was apprehensive about this supplier that I had never heard of but the fan arrived after about three weeks which isn't bad considering it had to come from China. It appears to work too so all is good. In addition to the fan you will also need to have the following items ready to use before you start:
Now I have more than one computer but this one is the best of them all and the one that I do all my work on. To have it become unusable is unthinkable as it would cause me a whole lot of trouble. So I used it like this for months. Tapping the case every few minutes to make it shut up. I even bought a new fan but was too afraid to do anything with it for weeks. It was driving me nuts so I finally gave in and decided to do the surgery. It turns out to my relief that the procedure was straightforward and I now have a nice quiet laptop again. If any of you out there are thinking of doing the same thing then this might give you the confidence to sort out your noisy fan. Remove the battery, screws, CD tray and hard drive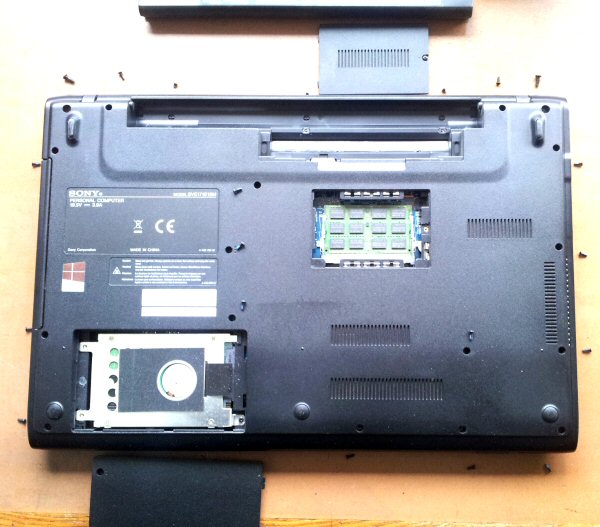
Turn off the PC and remove the power cable then flip the Vaio onto it's back and remove the battery. The battery has a 'lock' and a 'release' catch. Slide the 'lock' to unlocked, slide the 'release' and remove the battery. Remove all the screws that you can see. Unscrew the two screws in the hard drive cover and one screw from the memory cover. Remove both covers. The screws holding the covers in place are captive and should come away with the covers. Remove the screw holding the hard drive in place then grab the black tag at the right of the drive and slide away from the connector. The hard drive can now be lifted from the compartment. There are three sizes of screw holding the bottom of the PC to the motherboard. There are two large screws either side of the battery compartment and three tiny screws inside the battery compartment. All other screws are mid-sized and all the same. One of the screws above the hard drive holds the CD drawer in place. Once you have removed the screws you can slide out the CD tray. The final screw is inside the memory compartment. I missed this one at first and the case will not come off unless it is removed. 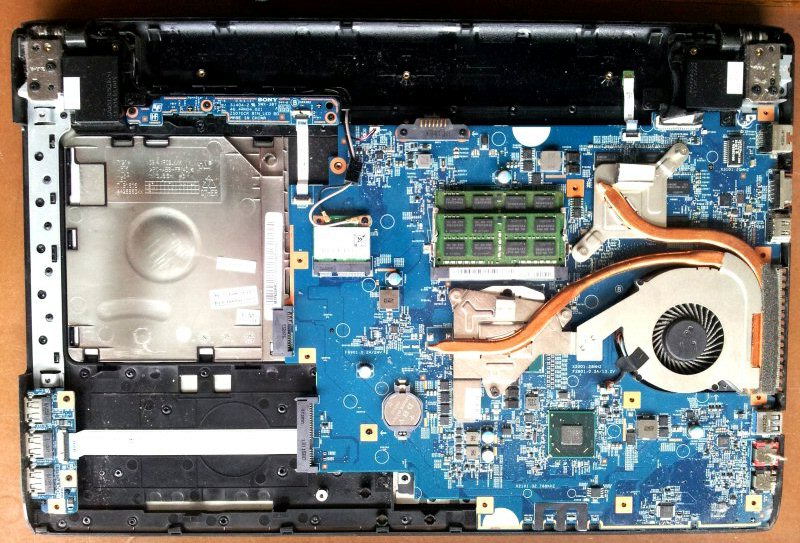
The motherboardCarefully remove the base of the casing. You might have to go around the seam gently popping it out of it's clips. If you haven't done so already put on a pair of surgical gloves to help keep you clean and help to prevent contaminating surfaces when you touch them. The fan to be replaced can be seen to the right. It has two spidery copper bars attached to it. These bars conduct the heat away from the chips on the motherboard and are then cooled by the fan 
Make a note of which way the small power connector is inserted into it's socket on the motherboard then remove it. The fan is attached to the heat sink so it all needs to come out. There are six screws. One holding the fan in place and the other five clamping the heat sink to the chips that get hot. The screw holding the fan in place is located towards the edge of the case and is indicated by an arrowhead on the circuit board legend. Remove this screw completely before moving on to the heat sink clamps which require a little more care in dismantling and putting back together again. 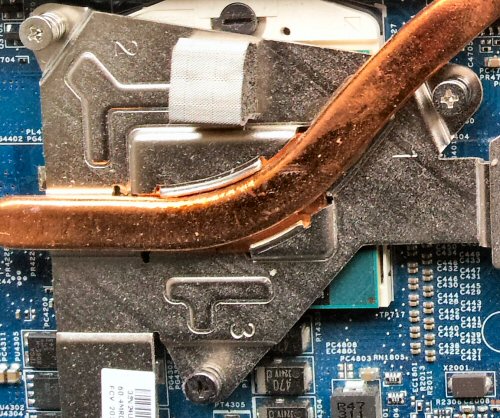
Notice that the screws holding the heat sinks in place are numbered. Do not ignore these numbers because they are there to ensure that the heat sink is clamped properly to the motherboard to make a good even thermal contact with the chip casings. This is important because if the heat sink does not make a good thermal contact with the chips then heat will not be dissipated by the fan, the chips will overheat and damage may result. You don't want this to happen, trust me. Begin by unscrewing screw number '1' then proceed to unscrew the other four screws in numerical order. When you replace the heat sink you should screw it down in the reverse order. 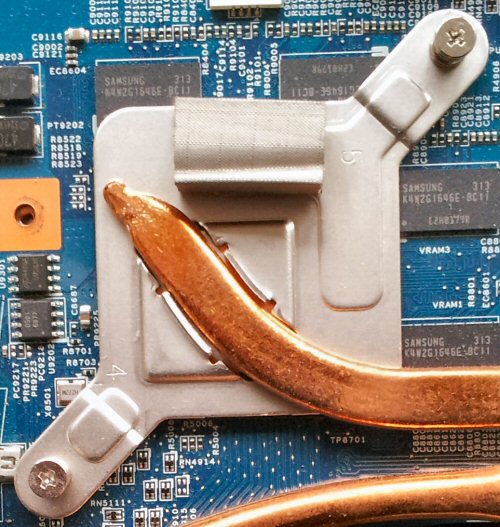
The screws are spring loaded and retained in the holes of the heat sink so they can't fall out. Now that all the screws are out you can gently remove the whole fan and heat sink assembly from the motherboard. If you encounter resistance then stop pulling. One or more of the screws may not be completely free of it's threads. The image below shows the fan and heat sink out of the case and the shiny tops of the two heat generating chips exposed on the motherboard. When you remove the assembly you will see that the chips and the heat sink are caked with heat sink compound. This substance helps to conduct the heat from the surface of the chips to the heat sink and should be cleaned off with isopropyl alcohol then replaced with fresh before reassembly. 
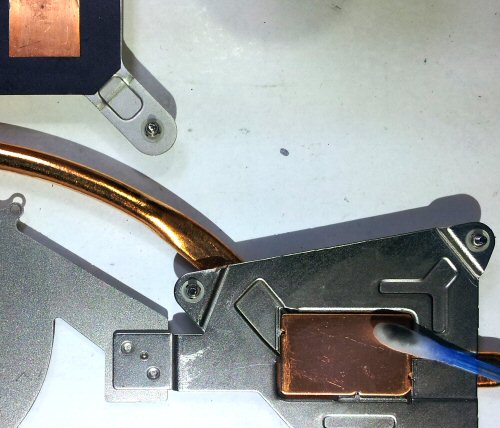
Soak the tip of a cotton bud in Isopropyl alcohol then use it to remove all of the old heat sink compound from both of the copper surfaces on the underside of the heat sink. When the alcohol has dried off and there is no trace of the old heat sink compound you can squeeze a little compound from your new tube onto all four surfaces on the heat sink and the tops of the chips. You should aim to completely cover the surfaces with compound without applying more than needed to do so. This should provide the best thermal coupling. Carefully replace the fan and heat sink assembly onto the motherboard. Try not to touch the surfaces anywhere apart from when they are supposed to go or you could end up in a mess. Insert the small screw holding the fan in first before locking down the heat sink. Screw down the heat sink screws in reverse order - 5 -4 - 3 - 2 - 1. Before replacing the base of the PC use your can of compressed air to blow all the dust from the inside of the case base. Make sure you clean out around all the ventilation holes. Now put the case back on. Press and ensure that it is clipped in all the way around then place the screw in the memory compartment followed by the hard drive and the CD drive. Power it up and you should have a nice quiet PC to use. | |||
| Now subscribe to our newsletter and don't miss a thing | |||
|
|


You should assume that there is an affiliate relationship and/or another material connection to the providers of goods and services linked to on this page and that we may be compensated when you purchase from a provider. Homediyelectronics.com is a participant in the Amazon Services LLC Associates Program and the Amazon EU Associates Programme, an affiliate advertising program designed to provide a means for sites to earn advertising fees by advertising and linking to amazon.com and amazon.co.uk.
Copyright © 2013 - 2026 homediyelectronics.com |
Legal |
Contact me |
Feed |
Google |
Site Map
Comments
No comments yet.Add Comment