

Raspberry Pi Beginner Projects: Setting Up
First
2
3
4
5
6
7
8
Last
Next >>
Raspberry Pi Beginner Projects: Setting Up Raspberry Pi Beginner Projects: Parts List Raspberry Pi Beginner Projects: Putting The Hardware Together Raspberry Pi Beginner Projects: Raspbian Operating System Raspberry Pi Beginner Projects: Updating Raspbian Raspberry Pi Beginner Projects: Installing VNC Raspberry Pi Beginner Projects: Using SSH and SFTP Raspberry Pi Beginner Projects: Give your Pi a name Raspberry Pi Beginner Projects: Making The File System Visible
How to set up your Raspberry Pi B+ ready to build projects
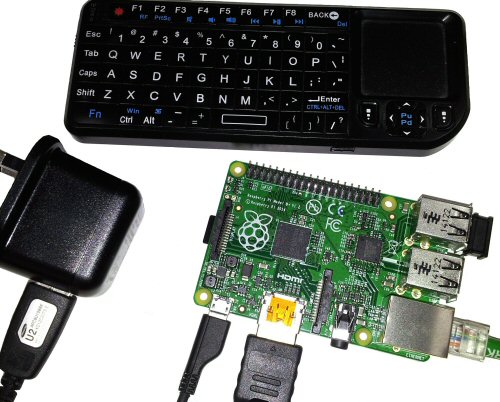
Are you about to get a raspberry Pi but are afraid that it might be too complicated to get going? Have you been looking for a comprehensive guide on how to set up a Pi ready to start programming and building projects? If the answer to either of these questions is true then you have come to the right place. I've just been through the process of getting my own brand new Raspberry Pi B+ up and running with the intention of programming it to do all sorts of things and I'm going to show you how I did it right here. The Raspberry Pi is an impressive piece of kit to say the least. I've been designing and coding embedded systems for three decades now so I had a good idea of what to expect when I fired up my Pi. Despite this I've been blown away with it. I knew it was good but not this awesome. It turns out that it isn't as complicated to install as you might imagine. Yes there is a lot to do but you can get through it in an evening and each individual step is quite small and well documented. If you get stuck and you can't find a solution to a problem here then help is just a short Google search away. The hardwareThe B+ version of the Pi is the size of a credit card, literaly. Ok it is a bit thicker than most but you can completely hide the Pi underneath one. On this board you get a 700MHz cpu, 512MB SDRAM memory, Ethernet, HDMI and composite video + audio, 4 USB sockets, 27 GPIO pins, a DSI display connector, a CSI-2 interface for a camera and a micro SD card slot. Wow that's an impressive array of hardware in anyone's book and at the price, roughly $41 or £27 in the UK at the time of writing (August 2014), I'm guessing that it can't be beaten. You need to add a power supply and a micro SD card of course but these are relatively cheap too. Power supplyThe B+ uses a little more power than it's predecessors and with 4 USB ports supplying power to peripherals you should plan to get a 5V supply capable of 2A. The power connection is via a micro USB socket on the board so the PSU can double as a charger for your phone. Micro SD cardThe operating system for the board is contained on a single micro SD card slotted into the underside of the Pi. I had a 16GB class 4 card spare so that's what I used but you can use a 4GB or 8GB device if it's more convenient. The card should be as fast as possible but mine seems to be ok with the relatively slow class 4 card. I will be showing you how to install the operating system onto the SD card later. Software: The Raspbian operating systemDeciding which operating system to use on the Pi can be a bit daunting because there are no less than 6 different OSs on the download page. That's not including the "New Out Of Box (NOOBS)" download. If you are really new to all this stuff then your best option is probably going to be NOOBS because it's easier to install and it contains all of the OS options in the one image. That means that you can choose your operating system while it is booting for the first time and you can change you mind at any time. I didn't go the NOOBS route because I wanted to have the maximum amount of memory space on the card for programs and files. If I need multiple operating systems then I will create them on individual SD cards. In this article I will be describing how I installed the Raspbian operating system. I chose Raspbian because it seems to be the most commonly used OS on the Pi and should do everything that I need. If you want to use NOOBS instead then please refer to the NOOBS installation instructions. There is a list of parts to the system on the next page.
First
2
3
4
5
6
7
8
Last
Next >>
Raspberry Pi Beginner Projects: Setting Up Raspberry Pi Beginner Projects: Parts List Raspberry Pi Beginner Projects: Putting The Hardware Together Raspberry Pi Beginner Projects: Raspbian Operating System Raspberry Pi Beginner Projects: Updating Raspbian Raspberry Pi Beginner Projects: Installing VNC Raspberry Pi Beginner Projects: Using SSH and SFTP Raspberry Pi Beginner Projects: Give your Pi a name Raspberry Pi Beginner Projects: Making The File System Visible |
| Now subscribe to our newsletter and don't miss a thing |
|
|

You should assume that there is an affiliate relationship and/or another material connection to the providers of goods and services linked to on this page and that we may be compensated when you purchase from a provider. Homediyelectronics.com is a participant in the Amazon Services LLC Associates Program and the Amazon EU Associates Programme, an affiliate advertising program designed to provide a means for sites to earn advertising fees by advertising and linking to amazon.com and amazon.co.uk.
Copyright © 2013 - 2026 homediyelectronics.com |
Legal |
Contact me |
Feed |
Google |
Site Map
Comments
No comments yet.Add Comment