

Raspberry Pi Beginner Projects: Using SSH and SFTP
<< Previous
First
2
3
4
5
6
7
8
Last
Next >>
Raspberry Pi Beginner Projects: Setting Up Raspberry Pi Beginner Projects: Parts List Raspberry Pi Beginner Projects: Putting The Hardware Together Raspberry Pi Beginner Projects: Raspbian Operating System Raspberry Pi Beginner Projects: Updating Raspbian Raspberry Pi Beginner Projects: Installing VNC Raspberry Pi Beginner Projects: Using SSH and SFTP Raspberry Pi Beginner Projects: Give your Pi a name Raspberry Pi Beginner Projects: Making The File System Visible
Secure Remote terminal and file transferOn the VNC page you learned how to set up your Pi and computer so that you could access the Raspbian desktop GUI across your local network. In this article I'm going to show you how you can open up remote terminal windows and do simple file management across your local network too. You may want to note that you can also use any of these tools across the Internet from anywhere. You just need to make a few changes to your local router and network setup. This is beyond the scope of this article but I will try and cover it in future writings. PuTTy - Remote Telnet and SSH clientTo access your Raspberry Pi terminal interface using the SSH or "Secure Shell" you can use the excellent and free "PuTTy" utility. You will find download page links on the official PuTTy page. Download and install it now. When you have PuTTy installed you can run it and enter the IP address of your Pi in the host name box. The port number should be set to 22 and the radio buttons to "SSH".
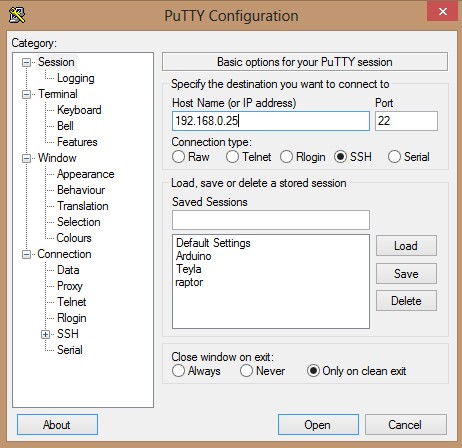
If you wish you can enter a name in the "Saved Sessions" box and save it to avoid some typing in the future. make sure that your Raspberry Pi is powered up, fully booted and connected to your network then click the "Open" button. You should now see a text based command window open up and a login prompt from your Pi, just as you would see on your main console display after booting. Login with the default credentials:
login as: pi If you have got the authorization correct you should then see a welcome message from your Pi and a command line prompt. You can now enter commands as if you were using the Pi's local console. WinSCP - SFTP clientRight so now you can remotely interact with your Pi's desktop with VNC and access the command line from your PC with SSH. All that is missing is a convenient way to transfer files between your Pi and PC or any other device on your network. The tool that I use for Windows based Raspberry Pi file transfer is called "WinSCP" and you can download it from here. Install it and run it.
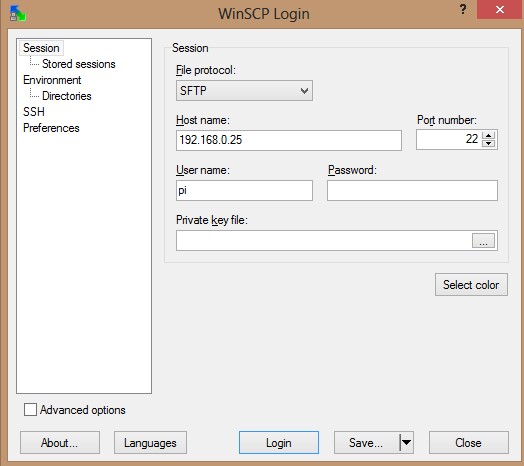
Select "SFTP" from the dropdown menu. SFTP stands for "Secure File Transfer Protocol". It provides simple file transfer with encryption. Enter the IP address of your Pi in the "Host name" box and "Port number" 22. Enter the username "pi" and leave the password blank. You can save this session if you wish by clicking "Save" and entering a name. Click the "Login" button and accept the encryption key. You can either accept it for just this time by clicking "No" or you can save the key on your machine by clicking "Yes" Enter the password "raspberry" and then "OK". You should now see a familiar split window with your local machine files in the left pane and your Raspberry Pi's files in the right hand pane. That's it. Transfering files between the two systems is as easy as dragging and dropping. On the next page I will show you how to change the name of your Pi from the default "raspberrypi".
<< Previous
First
2
3
4
5
6
7
8
Last
Next >>
Raspberry Pi Beginner Projects: Setting Up Raspberry Pi Beginner Projects: Parts List Raspberry Pi Beginner Projects: Putting The Hardware Together Raspberry Pi Beginner Projects: Raspbian Operating System Raspberry Pi Beginner Projects: Updating Raspbian Raspberry Pi Beginner Projects: Installing VNC Raspberry Pi Beginner Projects: Using SSH and SFTP Raspberry Pi Beginner Projects: Give your Pi a name Raspberry Pi Beginner Projects: Making The File System Visible |
| Now subscribe to our newsletter and don't miss a thing |
|
|

You should assume that there is an affiliate relationship and/or another material connection to the providers of goods and services linked to on this page and that we may be compensated when you purchase from a provider. Homediyelectronics.com is a participant in the Amazon Services LLC Associates Program and the Amazon EU Associates Programme, an affiliate advertising program designed to provide a means for sites to earn advertising fees by advertising and linking to amazon.com and amazon.co.uk.
Copyright © 2013 - 2024 homediyelectronics.com |
Legal |
Contact me |
Feed |
Google |
Site Map
Comments
No comments yet.Add Comment